 [ad_1]
Loki is a private currency based on Monero. For this reason, Loki has the privacy features of Monero, integrated Ring CT. The added enhancements offered by Loki are the ability to use decentralized private apps on the currency. The first SNApp will be a messaging service. Loki will also allow users to create SNApps on the network, using an SDK that will be released around March 2019. This coin reminds me of Zencash, and it is interesting to see this type of coin on the Cryptonight Heavy algorithm.
Note, this currency uses the Cryptonight Heavy algorithm. This means that you will have a slower draw speed on this coin than other Cryptonight coins.
Now that we know the details of Loki, let's move on to the mining of some LOKI!
Some general tips for mining
So, before starting this tutorial, I have two suggestions to make the most of your mining experience. First make sure you have the latest drivers for your GPUs. Secondly, most mining software will be flagged as virus by virus scanners. For this reason, if you perform mining operations on your normal gaming or everyday computer with an antivirus installed, it is advisable to exclude the mining software from the antivirus. What I like to do is create a folder and then insert all my mining software into subfolders. Then I exclude the top-level folder from the antivirus and this excludes all the mining software.

Mineral pools
The first thing we need is a mining pool. You can mine mine, but the payments could take months, depending on how powerful your mining rig is, and the mineral pools usually require a very small fee (1% or less). Using a pool will allow you to receive consistent payments, several times a day. For Loki, there are some pools. I chose to extract on https://loki.hashvault.pro/en/#!/

As for their functionality, they have a small pool. They have multiple servers in the United States, Europe and Asia, they charge 0.9% tax, have an SSL connection available for extraction, support direct mining in one exchange and have a & # 39 payment threshold. This means that you can set at what amount you want the pool to pay you automatically.

A unique thing about this pool is that they have almost all the Cryptonight coins available to extract them in the pool. I think this is a good feature, because you can easily switch to another coin if you wish, and you'll already be familiar with the dashboard and website pool configuration.
Because the data mining pool has multiple servers in the United States, Europe, and Asia, they are also configured for GeoDNS. This means that everyone uses the same server as the mining pool in their configuration and the pool will connect to the nearest geographic server. This also has the advantage of acting as a fail safe if the server on which you are mining is interrupted, the GeoDNS will connect to another server.
They also have a variety of ports to connect to:

Use 80 if mining behind a firewall
Use 443 if you want to use SSL
Use 3333 if you are mining using a CPU
Use 5555 if you are using a GPU (one or two GPUs, such as a gaming computer)
Use 7777 if you are mining using a GPU mining farm (multiple GPUs such as 3 or more per computer)
Use 8888 if you are mining using a Nicehash
Now that we have a pool, let's configure the mining software!
Configuration of the extraction software
For the CPU, GPU – Nvidia and GPU – AMD exercises, we will use xmr-stak. It's open source, the most customizable and lets you use the mix of Nvidia GPUs and AMD and CPU, all from a single window. It is also available for Windows and Linux.
You can download xmr-stak at the address https://github.com/fireice-uk/xmr-stak/releases The latest version is 2.4.5, which is what we will use in this tutorial. If you need to use Linux, you will need to download the source code and compile the software. This tutorial will not focus on how to create xmr-stak from the source.
The first time you run xmr-stak, you'll have to configure it a little bit. We will cover the initial configuration here, and then you can read how to configure the miner in the section that concerns you (CPU, GPU – Nvidia and GPU – AMD)
When you run xmr-stak for the first time, you will be presented with two windows cmd

You can close what says you had to run to get administrator privileges.
You will then be presented with a series of steps that will guide you through initial software initialization. Once completed, you will not need to do it again.
The initialization steps will ask the following questions:
Type a port on which you want to use remote monitoring. Usually 8000 or 3000 are available on most home computer networks. Next, to monitor your data mining computers, you can enter the IP address and port of your mining computer, in a web browser on any device connected to your network, to view your total speed and other detailed reports.

Currency: – You will need to type "Loki"
Pool Address – This is the address and port of the pool you want to extract. For example, I typed "pool.loki.hashvault.pro:7777"
Username: this is your public key for your wallet.
For example I would put LAQ84CunrmHVT83mARffDY46z5VcXyR1ZRAJoJHVpe8SjbzDZiEUkuA5oCnwf9yyGU1NizyXgvHzvVZr98Qfk1BU9fy11ZJ
Password: type "x"
SSL support – type "n"
You want to use Nicehash – type "n"
Want to use more pools – type "n"

(note the above picture taken from my article How to mine Electroneum)
At this point the software should start the extraction. Wait until "logged into mining_pool: port" is displayed, and then close the mining software. If you look in the folder where the miner is stored, it should have created text files for the CPU and the graphics card (Nvidia or AMD). They would be called cpu.txt, nvidia.txt, amd.txt. It will also create a config.txt file and a pools.txt. In the next sections we will show how to modify txt files for each mining component, as well as how to disable a certain GPU or CPU brand from mining.
Pool configuration
At this point, your pools.txt should be configured, but I'll show you how to configure it manually. Open the pools.txt and you should see something similar

If you want to change server, change the pool address. To edit wallets, edit wallet_address. Leave the empty rig_id. Change the pool password based on the pool configuration.
After all, you have currency. You must tell XMR-Stak which currency is your data mining. They support most of the Cryptonight coins, so you can simply type in the coin name from the list in the txt file. If the currency you want to extract is not in the list, you should know which algorithm uses and use the name of the currency algorithm. If their is a whattomine calculator for your currency, the algorithm is usually listed, otherwise you can probably find information on the coin site.
CPU extraction
As far as CPU mining is concerned, the Cryptonight algorithm is the most profitable algorithm on which to use a CPU. For mining with the CPU, we can use xmr-stak or xmrig. xmr-stak has only precompiled binaries for Windows, while xmrig has them for Windows and Linux. Both have source code, so you can compile them to work with Linux if necessary.
You can download xmr-stak at the address https://github.com/fireice-uk/xmr-stak/releases
You can download xmrig CPU at https://github.com/xmrig/xmrig/releases
For this tutorial we will use xmr-stak.
After completing the initial configuration, we should be ready for mine. One thing to do is try and change the cpu.txt settings that xmr-stak has created for us to get the highest possible hash rate.

I have found that at least for the CPU, the program usually automatically generates the best possible configuration settings. The comments in cpu.txt do an excellent job of explaining each setting and how you can try to get more performance from your machine.
After configuring cpu.txt, you now need to create a boot batch file to run the program.
Just create a new batch file (or a script file if you use Linux) inside the folder where the miner is located and paste it into the batch file
XMR-stak.exe optional_flags
Replace "optional_flags" with nothing if you want the machine to fail using the CPU and any other GPU in the machine, or the following
-NoCPU Disables the CPU from mining.
-NoNVIDIA Disable all Nvidia GPUs in your system from mining.
-NoAMD Disables all AMD GPUs in your system from mining.
For example, my configuration is:
xmr-stak.exe --noNVIDIA
Double-click on the batch file to run the miner and you should see something similar

(note that the image above is taken from my article How to Make Monero Original)
To view the total speed at any time, press the "h" key on the keyboard when the mining software is in focus.
GPU Mining: Nvidia
As for the mining GPU that uses the Nvidia GPUs, we have the option of using xmr-stak or xmrig. xmr-stak has only precompiled binaries for Windows, while xmrig has them for Windows and Linux. Both have source code, so you can compile them to work with Linux if necessary.
You can download xmr-stak at the address https://github.com/fireice-uk/xmr-stak/releases
You can download xmrig Nvidia at https://github.com/xmrig/xmrig-nvidia/releases
For this tutorial we will use xmr-stak.
After completing the initial configuration, we should be ready for mine. One thing to do is try and change the nvidia.txt settings that xmr-stak has created for us to get the highest possible hash rate.

I've found that for the GPU, you can change the settings to get a little more performance, but typically the program usually automatically generates the best possible configuration settings. The comments in nvidia.txt do a great job of explaining each setting and how you might try to get more performance out of your machine.
After configuring nvidia.txt, we now have to create boot batch files to run the program.
Just create a new batch file (or a script file if you use Linux) inside the folder where the miner is located and paste it into the batch file
XMR-stak.exe optional_flags
Replace "optional_flags" with nothing if you want the machine to fail using the CPU and any other GPU in the machine, or the following
-NoCPU Disables the CPU from mining.
-NoNVIDIA Disable all Nvidia GPUs in your system from mining.
-NoAMD Disables all AMD GPUs in your system from mining.
For example, my configuration is:
xmr-stak.exe --noCPU
Double-click on the batch file to run the miner and you should see something similar

To view the total speed at any time, press the "h" key on the keyboard when the mining software is in focus.
GPU Mining – AMD
Regarding the GPU extraction using the AMD GPUs, we have the option of using xmr-stak, xmrig, Cast XMR or the AMD Claymore miner Cryptonote.
You can download xmr-stak at the address https://github.com/fireice-uk/xmr-stak/releases
You can download xmrig Nvidia at https://github.com/xmrig/xmrig-nvidia/releases
You can download Cast XMR on https://bitcointalk.org/index.php?topic=2256917.0;tutti
You can download Claymore & # 39; s Cryptonote AMD miner on https://bitcointalk.org/index.php?topic=638915.0
For this tutorial we will use xmr-stak.
After completing the initial configuration, we should be ready for mine. One thing to do is try and change the settings of amd.txt that xmr-stak has created for us to get the highest possible hash rate.

I've found that for the GPU, you can change the settings to get a little more performance, but typically the program usually automatically generates the best possible configuration settings. For my Vega system, I had to add two threads for GPUs. The comments in amd.txt do a great job of explaining each setting and how you might try to get more performance out of your machine.
After configuring amd.txt, we now have to create boot batch files to run the program.
Just create a new batch file (or a script file if you use Linux) inside the folder where the miner is located and paste it into the batch file
XMR-stak.exe optional_flags
Replace "optional_flags" with nothing if you want the machine to fail using the CPU and any other GPU in the machine, or the following
-NoCPU Disables the CPU from mining.
-NoNVIDIA Disable all Nvidia GPUs in your system from mining.
-NoAMD Disables all AMD GPUs in your system from mining.
For example, my configuration is:
xmr-stak.exe --noCPU
Double-click on the batch file to run the miner and you should see something similar

To view the total speed at any time, press the "h" key on the keyboard when the mining software is in focus.
If there are problems, you may not have enough virtual memory. You may need 16 GB of virtual memory (for Vega GPUs you need more than 16 GB per GPU) to change it go to Control Panel -> System and Security -> System and click on Advanced System Settings on the left. From there, click Settings on the Advanced tab. After clicking edit, then on the third screen, deselect the automatic management, choose the custom size and type the size (in MB) for both text boxes. Then press the set button, then the ok button.

Solving general problems
One thing to monitor is stale or rejected shares. If you see a lot of expired shares, you may want to try a server closer to you. If you see a lot of rejected actions, try to reduce the miner's intensity, if available.
Configuring the custom payment threshold
If you chose to include an email in the password field for mining computers, you can change the amount that the mining pool will pay for. To do so, click the Settings button in the upper right corner of the website's dashboard. A box should open this way
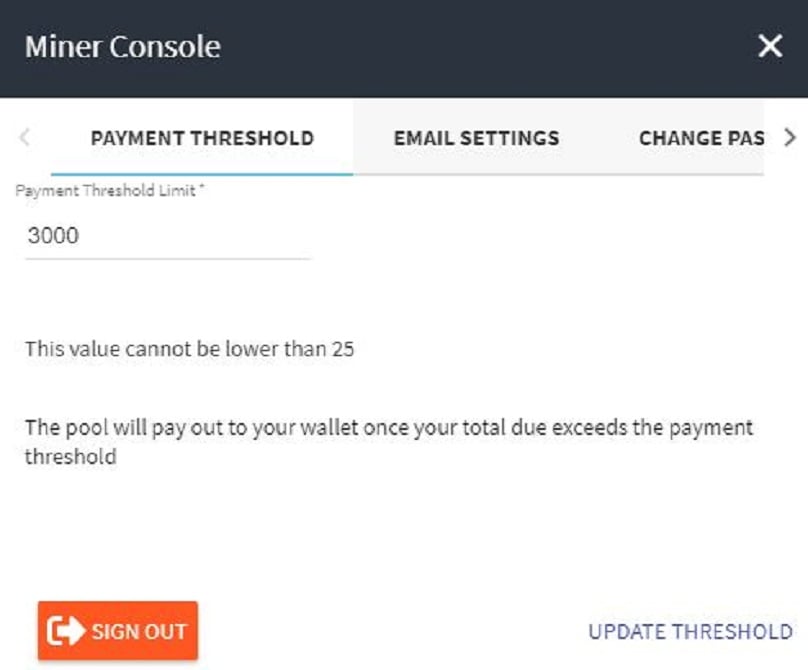
You will then need to enter the payment threshold amount in the text box, then click on the UPDATE THRESHOLD button.
How much will I earn LOKI per day?
To figure it out, you would go to http://whattomine.com and use the calculator. They have calculators for most of the coins that are available for mine. In this case, the LOKI calculator is located at https://whattomine.com/coins/249-loki-cryptonightheavy The calculator gives a rough estimate, so you may receive a sum higher or lower than the one actually indicated by the calculator .

Most of the values are already entered correctly and you only have to change some values.
Hash rateEnter your total speed (in hashes per second) for all your mining computers. This would be the value of "total speed" in your data mining software. I would like to use the total speed of 15 minutes, as this would be a better average total speed. Be sure to add all the computers you use for Loki mining.
Power: Enter the total amount of power (in watts) used by your rig. Some mining software will measure it for you. You can also measure the total energy consumption for your computer using special software or a kilowatt meter. I prefer to use a kilowatt meter, because I find it to be the most accurate. Be sure to add all the computers you use for Loki mining.
Cost: Enter the cost per kilowatt hour you pay to the power company. I was able to find this information on my monthly bill, as well as on their website.
Pool rate: Enter the pool rate + the mining software development fee. For our example, you will enter 0.9 + 2 = 2.9
Hardware cost: Enter the total cost of all your hardware.

Using my AMD Vega system for an example, I'll show you how to read the data. In the image above there are really 3 things I'm looking for.
# 1 Look at the Difficulty 24 hours and the Difficulty 7 days. We want them to be all the same, what they are. This tells us that the calculations that we will see in the second image below, will be precise for the days to come, provided the price is not volatile.
# 2 Look at the FORMER. 24 hours volume and the Market Cap. Generally, the bigger these are, the less the price will be volatile. We want the price to be non-volatile, so our calculations will be accurate for the days to come. In this example, market capitalization is small.
# 3 Look at the Create 1 BTC in and the Break even in. It is always interesting to see how long it will take your rig to create 1 BTC. The break even in, will show you a rough estimate of how long it would take to pay for your mining rig, extracting this particular coin. This is great to use before building your mining rig, to see how long it will take before you see the profits.

In this image, we can quickly see how many coins and value in USD we will make in certain periods of time. You want to see the Profit column, as this is the value after paying for your electricity consumption. I usually focus only on the daily payment in USD. By focusing only on this number, you can run the calculator for a few different currencies and quickly see which currency is most profitable for setting up the mining platform. Keep in mind that you also want to weigh the daily payment with the market capitalization. A low capitalization coin could be really profitable one day, so it could have half the payment tomorrow.
That's all. Now you should extract Loki! Be sure to type your public key in the mining pool control panel to keep track of your statistics.
